 With announcements, you can post timely information critical to course success. On the Announcements page, you can add, edit, and delete announcements. This is an ideal place to post time-sensitive material including:
- Due dates for assignments and projects.
- Changes to your syllabus.
- Corrections/clarifications of materials.
- Exam schedules.
When you add an announcement, you can also send the announcement as an email to students in your course. This ensures that students receive the announcement even if they do not log in to your course. If you include links to course content, the email will not include links to that content.
Watch a Tutorial
Double-click the video to enlarge the viewing area.
How to Create Announcements
Announcements appear in the order posted, with the most recent announcements appearing first.
- On the Control Panel, expand the Course Tools section and click Announcements.
- On the Announcements page, click Create Announcement on the action bar.
- On the Create Announcement page, type a Subject. This becomes the title of the announcement on the Announcements page.
- Type your message.
- In the Web Announcements Options section, click:
 Not Date Restricted to keep the announcement visible until you remove it.
-OR-
Date Restricted to limit the announcement's visibility by date and time.
- Select the Display After and Display Until check boxes to enable the date and time selections.
- Select the Email Announcement check box to send students an email containing the announcement. The email is sent to all students, even those who choose not to receive announcement notifications through email. Your institution determines if this option is available.
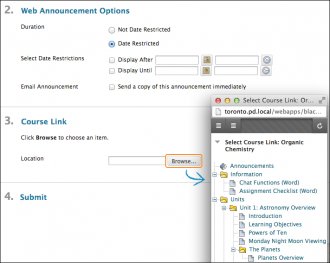
- Optionally, in the Course Link section, click Browse to link to a course area, tool, or item.
- Click Submit.
Reorder Announcements
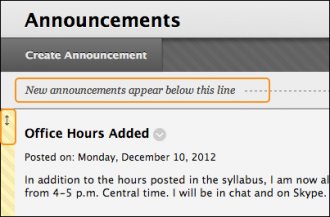
Announcements appear directly below the repositionable bar. Reorder by dragging the bar or announcements to new positions. Move priority announcements above the repositionable bar to pin them to the top of the list and prevent new announcements from superseding them. The order shown is the order presented to students. Students do not see the bar and cannot reorder announcements.
RELATED VIDEO

Share this Post
latest blog posts
-

-

-

-
 Christmas cards offers November 9, 2023
 -
 CVS Christmas card November 5, 2023
 -
 Christmas cards Making November 1, 2023
 -
 Make your own Love cards October 28, 2023
 -
 Cards from October 24, 2023
 -
 American Greetings Boxed Christmas cards October 20, 2023
 -
 Make your own Valentine cards online free October 16, 2023
 -
 Print your own Christmas cards October 12, 2023
 -
 Card companies online October 8, 2023