
 Using distress inks as watercolors is a great project for card makers who are thinking about investing in a set of watercolors but want to do a bit of experimentation before they do. Water-soluble Ranger Tim Holtz Distress Ink Markers will serve as our watercolors, and many card makers already have at least a few in their stash.
Here’s what you’ll need:
- Watercolor paper (I used Distress Watercolor card stock)
- Painter’s tape or another low tack tape
- An A2 card base
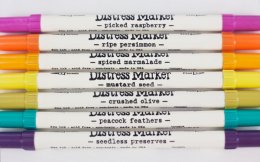
- Distress Ink Markers in several colors (I used Picked Raspberry, Ripe Persimmon, Spiced Marmalade, Mustard Seed, Crushed Olive, Peacock Feathers and Seedless Preserves)
- A patterned rubber stamp (I used the Hero Arts Tiny Ink Spots stamp)
- A paper trimmer or scissors
- A small spray mister filled with water
- Any die-cut sentiment
- White card stock
- Craft glue
- Double-sided adhesive
- Zig Wink of Stella clear glitter brush tip marker (optional)
- Paper towels (for cleanup and for absorbing any excess water)
Step 1:
Tape a piece of A2 size watercolor card stock to a solid surface (a desktop, the cardboard backer of a notebook, a clipboard) with painter’s tape or some other low tack tape. Cover only about 1/4” of the card stock on each side when you tape it down.
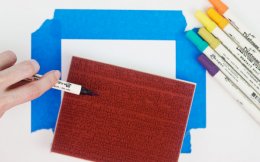
Step 2:
 Working left to right, color in blocks of the stamp, one color at a time. A little overlap between colors is a good thing here because new colors will be created in the overlap area, making the result even more colorful. Be sure to use the side of the marker’s brush tip to prevent any damage to the tip and to get better coverage.
Step 3:
When you’re finished coloring in the stamp, hold a small spray mister about 6” above the surface of the stamp and spritz several times (I spritzed 5 times).
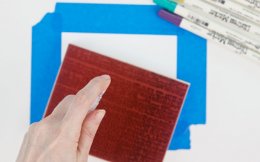
Step 4:
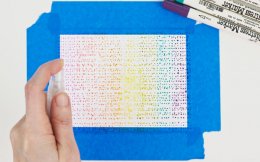
Press the stamp onto the surface of the watercolor card stock. When you lift the stamp, you may notice, like I did, that the pattern doesn’t quite have the watercolor effect that you want. Simply spritz the card stock until you’ve achieved the result that you want. Set aside to dry completely.
Note: Holding the spritzer closer to the surface of the card stock (2” to 4”), as I did in the orange/yellow area, will concentrate the water spray in a more defined space and will spread the color around much more, while holding the spritzer further away (8” to 12”) will spread the color in a more subtle way.
Step 5:
While your watercolor piece is drying, die cut your sentiment multiple times from white card stock. I cut 5 copies of the “thanks” sentiment with my Silhouette Cameo. Add dots of glue to the top of each piece, minus the top piece. Optionally, after you’ve adhered the top piece, brush it with a clear Wink of Stella marker to give it some shimmer.
To finish the card, remove the painter’s tape from the dry watercolor piece and trim off the edges with a paper trimmer or scissors. Attach the piece to an A2 card base with double-sided adhesive and glue the sentiment on top.
RELATED VIDEO


Share this Post
latest blog posts
-

-

-

-
 Christmas cards offers November 9, 2023
 -
 CVS Christmas card November 5, 2023
 -
 Christmas cards Making November 1, 2023
 -
 Make your own Love cards October 28, 2023
 -
 Cards from October 24, 2023
 -
 American Greetings Boxed Christmas cards October 20, 2023
 -
 Make your own Valentine cards online free October 16, 2023
 -
 Print your own Christmas cards October 12, 2023
 -
 Card companies online October 8, 2023