
 Christmas, New Year, birthday, graduation, anniversary, wedding – there are so many reasons to congratulate your loved one, family, friends, and colleagues with this or that holiday or special event. If you’ve run out of gift ideas, here’s an idea: why not express your feelings in a beautiful, personalized slideshow instead of a greeting card from a next door gift shop?
Combine your best photos with video clips, photos, and titles, join slides with animated transitions, and upload the result to YouTube or Facebook for that special someone to see. Check our demo slideshow and read the tutorial on how to make a romantic video using Movavi Video Editor. This simple yet powerful software will help you to make a video present for your boyfriend or girlfriend (or husband or wife) that will amaze and entrance the recipient, even if you’ve never made one before.
What could be better than making special gifts with your own hands? Especially when we're talking about a homemade video greeting card for your loved one on Valentine's Day. Movavi Video Editor will help bring all your creative ideas to life.
Using Movavi video editing software, you will be able to create a unique personalized gift for any occasion – wedding, birthday, school/college event, or corporate party – not just Valentine’s Day. Your slideshow or photo movie will add a festive atmosphere to any celebration.
Here are a few ideas for creative video greetings:
- A birthday slideshow: surprise your friend
- A wedding slideshow: create a gift for newlyweds
- A Christmas / New Year slideshow instead of a boring old newsletter
- Valentine’s Day – a friendly valentine or a romantic declaration of love
- A video about your company and colleagues for a corporate event
- A travel slideshow reliving your most unforgettable trips
- Photo slideshows of your children for family reunions
 Download Movavi Video Editor with its intuitive interface and customized settings and create your first video slideshow right now!
Step 1. Install Movavi Video Editor
Double-click the setup file and install Video Editor according to the onscreen instructions. Thanks to the simplicity of the interface, you’ll be able to start working with the program right away, even if you have never used a video editor before.
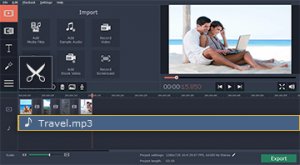
Step 2. Choose Photos, Clips, and Music for Your Slideshow
Choose your favorite photos, music, and/or videos from your collection - these will become the main material for your video project. Movavi video editing software supports almost all multimedia formats, so you can use any images, video, and audio files for your project. Launch the program, click Add Media Files, and select the files you plan to work with. Your videos and photos will be added to the Video Track on the timeline; audio files will appear on the Audio Track. You can also drag and drop your files to the working area and place them in the order you want.
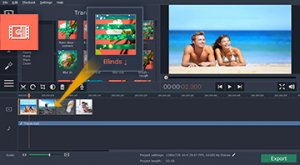
Step 3. Join Slides with Transitions
To really make your slideshow come together, add animated transitions between images. To do this, just open the transitions library by clicking the Transitions tab and drag your preferred transition style between adjacent images or clips on the timeline.
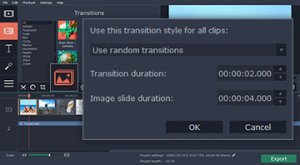 You can quickly add transitions between all slides at once by clicking the special button on the toolbar above the timeline. You’ll see a window where you can choose the transition style and set the transition and slide display duration.
Step 4. Edit Audio Track
If you need to shorten the added music track, select an audio block on the Audio Track, place the red marker at the desired truncation point and click the right mouse button. Select Split on the context menu, or click the scissors button on the toolbar. Now your track is split into two parts, so just select and delete the one you don't need.
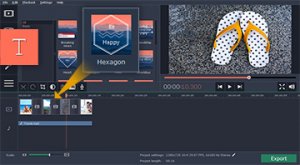
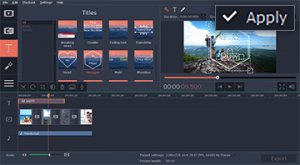
Step 5. Add Titles
Go to the Titles tab to review the available title styles. Сlick each one to see a short preview. Once you decide which style you like best, drag and drop it onto the timeline – a Titles Track will appear automatically, and the text will be overlaid on the video. You can move titles around on the track to match them to the images as you wish. If you want to insert text between clips, or add opening and closing titles, just drop the selected captions onto the Video Track and place them where you want.
To enter your text, double-click the title on the timeline. It will appear in the preview window, where you can type the text, set the font and color properties, and more. Click Apply to save changes.
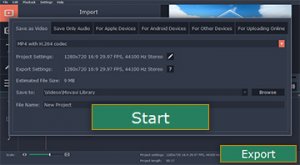
Step 6. Save Your Slideshow
All that's left to do now is to export the finished slideshow to a video file. Click the Export button and select the Save as Video tab; this is where you can specify the filename, destination folder, and the video format you want to use. If you want to be able to watch your video on a mobile device, open the appropriate tab to save for Apple, Android, or other device. You can also choose a preset for uploading your video to YouTube and other popular websites – use the special For Uploading Online tab. Finally, click Start – now you can sit back and enjoy your finished slideshow!
RELATED VIDEO


Share this Post
latest blog posts
-

-

-

-
 Christmas cards offers November 9, 2023
 -
 CVS Christmas card November 5, 2023
 -
 Christmas cards Making November 1, 2023
 -
 Make your own Love cards October 28, 2023
 -
 Cards from October 24, 2023
 -
 American Greetings Boxed Christmas cards October 20, 2023
 -
 Make your own Valentine cards online free October 16, 2023
 -
 Print your own Christmas cards October 12, 2023
 -
 Card companies online October 8, 2023