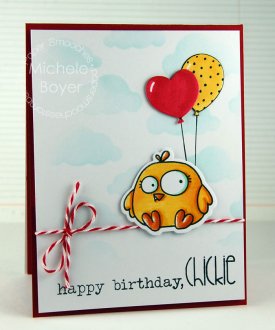
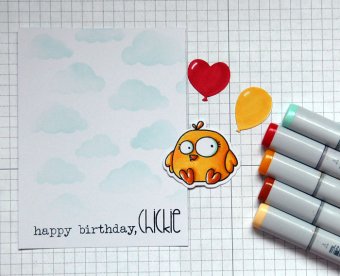
Homemade birthday card tutorial #1
Create a scene as well as unique sentiments by combining dies and stamps from different sets.
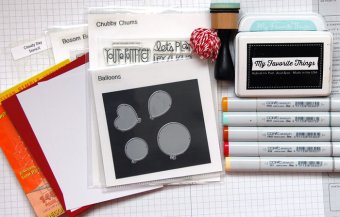
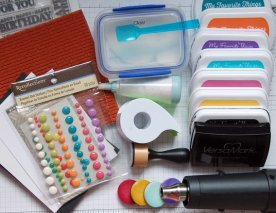
Supplies you'll need:
- Red top-folding 4 1/4" x 5 1/2" card base
- White Copic compatible card stock (I used X-Press It Blending Card)
- Black Copic compatible ink (I used Black Licorice hybrid by My Favorite Things)
- Light blue ink (I used Sno Cone dye by My Favorite Things)
- Image and sentiment stamps (I used Chubby Chums and Bosom Buddy stamp sets by Paper Smooches)
- Cloud stencil (I used Cloudy Day by My Favorite Things)
- Balloon dies (I used Balloon Dies by Paper Smooches)
- Copic markers (I used Y21, BG11, YR23, YR27 and R29)
- Copic 0.5 black Multi-liner
- Blending tool
- Die-cutting machine
- Red baker's twine
- Foam squares and foam tape
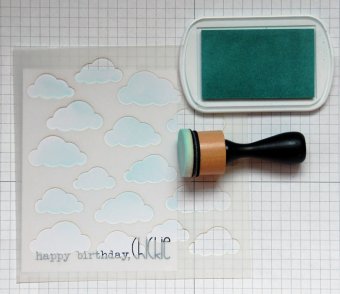
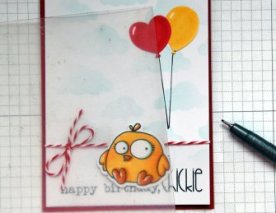
Step 1:
Stamp sentiment onto lower portion of white card stock. Secure card stock to scrap paper using removable tape and layer stencil atop. Holding stencil firmly in place, blend light blue ink over cloud openings applying more ink at the top and less toward the sentiment.
 Step 2:
Die-cut bird and balloon shapes from white card stock. Stamp bird and color all with markers.
Step 3:
Tie twine with bow to left side. Position bird onto twine (without adhering) to help determine placement of balloons. Using a straight edge and marker, draw balloon strings.
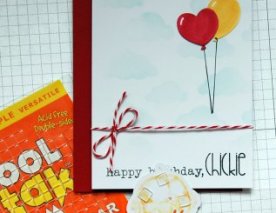
Step 4:
Adhere yellow balloon to card stock. Adhere red balloon using foam squares. Apply foam squares to back of bird and adhere over twine.
Step 5:
Using foam tape, adhere assembled panel to red card base.
Note: After assembling, I decided to add black dots to the yellow balloon.
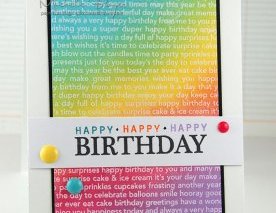
Homemade birthday card tutorial #2
Send colorful wishes by blending bright inks over an embossed background.
- White top-folding 4 1/4" x 5 1/2" card base
- White card stock cut to 3 1/4" x 4 3/4" and 4 1/4" x 1"
- Black card stock cut to 3 3/8" x 4 7/8"
- Text background stamp (I used Happy Birthday Background by My Favorite Things)
- Happy birthday sentiment (I used Celebrate You by My Favorite Things)
- Powder Tool
- VersaMark ink
- Clear embossing powder
- Heat tool
- Dye inks (I used Blu Raspberry, Daffodil, Ripe Raspberry, Grape Jelly, Tropical Teal, Orange Zest and Black Licorice by My Favorite Things)
- Blending Tool
- Removable Tape
- Enamel Dots
 Step 1:
Apply powder to white card stock. Ink text stamp with VersaMark and stamp onto card stock. Sprinkle with embossing powder and apply heat.
Step 2:
Beginning in upper left corner, apply blue ink, blending lower edges. Beginning in upper right corner, begin blending yellow ink, overlapping lower blue inked area. Beginning in lower left corner, apply pink ink, blending into bottom half of yellow area. From the bottom right corner, blend in purple, applying color into bottom half of pink area.
 Once inked, mat onto black card stock and adhere to card front.
To create the multi-color sentiment, mask off each portion of the stamp and stamp one word at a time. The black dots within the top line were added with a marker once the stamped words were complete.
Note: The word "happy" was stamped first in Tropical Tea, then Orange Fizz and Grape Jelly.
Adhere sentiment strip across card front; adhere enamel dots.
Homemade birthday card tutorial #3
Use die-cuts or 3-D stickers to create a simple yet unique happy birthday greeting.
- White top-folding 4" x 4 1/4" card base
- White card stock cut to 3 5/8" x 4"
- Scrap of cream card stock
- Patterned paper (I used Polka Mon Amie by Lawn Fawn)
- Sentiment and smiley face stamps (I used Alfresco and Sentiment Sampler by Paper Smooches)
- Cupcake and flag dies (I used Mini Cupcake and Adornments by Paper Smooches)
- Black dye ink (I used Black Licorice by My Favorite Things)
- Silver thread
- Enamel dots
Stamp sentiment into lower right corner of white card stock panel.
Die-cut cupcake and flag pieces from cream card stock scrap and patterned papers. Stamp or draw smiley face onto cupcake top.
Apply a bit of adhesive behind area where cupcake is to be placed. Wind thread around your fingers several times, then carefully remove thread from fingers and secure ends to applied adhesive. Gently separate/arrange the thread loops.
Adhere flags and assemble cupcake using foam squares to adhere cupcake top. Adhere enamel dots.
Note: A QuickStik or other tacky-end tool is very helpful in picking up and placing tiny parts such as the cupcake sprinkles.
Cut dotted paper to fit card front and adhere. Using foam tape, adhere assembled white panel to dotted paper.
RELATED VIDEO


Share this Post
latest blog posts
-

-

-

-
 Christmas cards offers November 9, 2023
 -
 CVS Christmas card November 5, 2023
 -
 Christmas cards Making November 1, 2023
 -
 Make your own Love cards October 28, 2023
 -
 Cards from October 24, 2023
 -
 American Greetings Boxed Christmas cards October 20, 2023
 -
 Make your own Valentine cards online free October 16, 2023
 -
 Print your own Christmas cards October 12, 2023
 -
 Card companies online October 8, 2023