
What you'll need to make enough salve to fill four 4-ounce jars:
- Dried herbs of your choice (see below for tips on choosing herbs), optional
- Glass bowl and saucepan (or double boiler), ideally with a lid
- 2 cups olive oil
- Mesh strainer
- Large jar or bottle to hold infused oil
- 2 ounces (by weight) yellow beeswax—either in chips, flakes, or pastilles
- Kitchen scale
- Stirring spoon
- 20 to 30 drops essential oil blend of your choice
- 1 teaspoon vitamin E oil
- Small glass jars or metal tins with lids
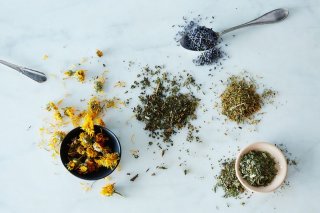
1. Choose your flowers and herbs, if infusing.
Choose the herbs you use based on the properties you’d like your finished salve to have: Some options include calendula, yarrow, chickweed, arnica, plantain leaf, comfrey, and St. John’s wort. These plants have antibacterial, soothing, and/or immunostimulant (that is, disease-resistant) properties that, combined with the moisturizing and protective elements of the salve, can help dry winter skin to heal.
Calendula, comfrey leaf, plantain leaf, lavender, and St. John's wort.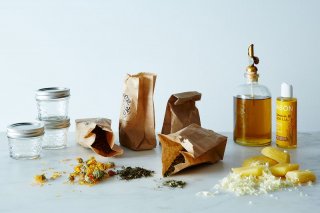 2. Infuse oil with herbs.
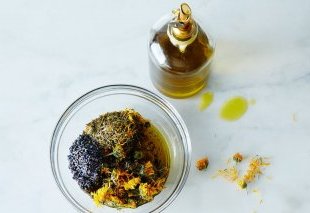
Place the herbs in a glass bowl (or the top part of a double boiler) and cover with olive oil. The ratio is up to you—more herbs will result in a more potent oil—but be sure to use enough oil that the herbs have room to expand as they rehydrate and still remain fully covered. I’ve found that 1/2 to 2/3 cup of herbs for each cup of oil works well.
For this salve recipe, start with at least two cups of oil here so that you’ll still have the necessary 1 1/2 cups after some is absorbed by the herbs and discarded.
Bring a small amount of water to a simmer in a saucepan (or the bottom of the double boiler) and place the bowl of herbs and oil on top. Make sure that only steam, not water, will touch the bowl; this method requires a very gentle heat. Cover the bowl if possible, turn the heat to low, and let the simmering water slowly heat the oil and herbs together for 2 to 3 hours.
Healing herbs and flowers soon to be infused in olive oil.If you’re not in a rush, you could instead choose to infuse the oil using the solar method: Seal the herbs and oil together in a clean, dry jar and leave it to steep in a sunny location for three to four weeks. If you’re using this method, be sure that the herbs you use are completely dried before beginning, to eliminate the risk of mold.
Regardless of which method you’ve used, when the infusion is complete, strain the oil through a mesh sieve into a clean jar and clean the glass bowl. (If you notice there are still a lot of tiny particles, you may want to do an additional strain through a finer sieve or a piece of cheesecloth.) If you have leftover oil after making your salve, add a few drops of vitamin E oil to help prevent rancidity and store it in a cool, dark place to use later.
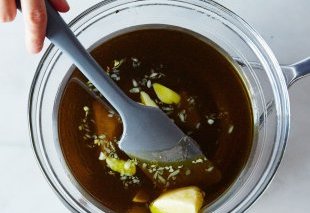
 3. Melt in the beeswax.
Before you start this step, pop a metal spoon in the freezer—it will come in handy in a moment! Set up your saucepan (or double boiler) with simmering water again, placing the clean glass bowl on top. Once again, keep the heat gentle; you will be warming the oil, but not so much that it bubbles.
Add 1 1/2 cups of herb-infused oil, or plain olive oil if you prefer, to the bowl (the 2 cups you infused with oil should have shrunken to about this much). Weigh 2 ounces of beeswax and add to the bowl. On low heat, warm the mixture until the beeswax is melted, stirring occasionally.
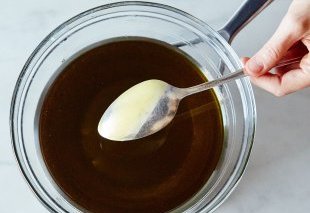
At this point, take the spoon from the freezer and dip it into the liquid. Some salve will solidify on the spoon and give you a preview of the texture—if you’d prefer a creamier final product, add a bit more oil to the bowl; if you want the salve to be harder, add a bit more wax.
Left: melting beeswax. Right: testing consistency on a frozen spoon.4. Add fragrance, if using, and jar.
When you are happy with your ratio of wax to oil and the wax is fully melted, turn off the heat. Thoroughly stir in 20 to 30 drops of whatever essential oils you like—you’re using them primarily for fragrance, so choose a blend that makes you feel good! I like mixing lavender and tea tree oils for a soothing, slightly medicinal scent. Stir in approximately a teaspoon of vitamin E oil at this point, as well. This antioxidant will extend the shelf life of your salve.
While it is still liquid, carefully pour the salve into jars or tins. Let it solidify overnight, or put the jars in the fridge if you want to speed up the process. Cleanup is easiest if you get to it before the beeswax cools and solidifies. Wipe out oily dishes with a paper towel and then wash normally.
Goodbye dry, post-dishwashing skin!Using your salve.
It’s important to know that unlike lotions or creams that impart moisture to the skin (also known as humectants), this salve works as an emollient, meaning it smooths skin and protects it from moisture loss. If your skin tends to be dry, you’ll get the best benefits by using salve to seal in moisture when your skin is slightly damp (like after washing your hands) rather than using it as a replacement for your usual lotion.
It’s always a good idea to test a small area of skin before using a lot of salve (or any new product), in case you have any allergies or sensitivities you didn’t know about. Avoid using salve on abrasions or open wounds unless you are certain that all the herbs you chose are safe for this purpose.
Keep your salve somewhere room temperature or cooler, as repeated melting and re-solidifying could damage the texture. Stored properly, it should keep for 1 to 3 years—if you can make it last that long!

Share this Post
latest blog posts
-

-

-

-
 Christmas cards offers November 9, 2023
 -
 CVS Christmas card November 5, 2023
 -
 Christmas cards Making November 1, 2023
 -
 Make your own Love cards October 28, 2023
 -
 Cards from October 24, 2023
 -
 American Greetings Boxed Christmas cards October 20, 2023
 -
 Make your own Valentine cards online free October 16, 2023
 -
 Print your own Christmas cards October 12, 2023
 -
 Card companies online October 8, 2023