
 I welcome you to please share the link in order to share the information and images found here, but please do not copy or save my photos. Thank you. You may also pin it on Pinterest using the Pin It button here …
Pin It
You’ve just finished the perfect session … the lighting was perfect, your clients were amazing to work with, the location and the props you lovingly selected with care were all fabulous. You feel giddy with the excitement of opening those images and seeing the art you captured. You next spend time carefully processing the images to perfection, making sure the color is perfect, the amount of contrast just right right, the details and clarity are spot on. Your clients view their proofs, oohing and ahhing the whole time … did you even see a tear or two in there? Everything is perfect … now who do you trust to print those images that you poured your heart and soul (not to mention time and money) into?
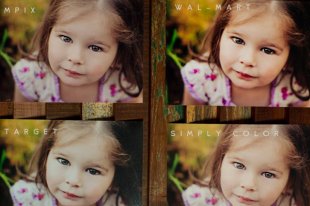
I don’t know about you, but after all that work bringing your photography and vision to fruition, the final product is a step that is of the utmost importance. I have been wanting to do a little demonstration for a while now, sending the same image to different labs and comparing the differences. I initially sent the image to a half dozen different chain/big box type print labs all over our town, but after viewing them I decided to not use most of them for this demonstration because they were all the same. And by the same, I mean both mediocre and wildly different. What?! Bear with me here. Sending your prints to non-pro labs is going to leave you with not only sub-par quality prints, but inconsistent results. The technician running the machine, the calibration of the printer, etc. are all going to influence your final prints. So, what may have come back from Wal-Mart with too strong contrast and a yellow cast one week will look drastically different the next. It’s a coin toss … washed out and blue?? Cyan and blown highlights?? But whatever the results, as inconsistent as they may be, you can count on the quality being inferior to that of a pro lab (or for non pros, MPIX).
I’ve decided to a fairly non-scientific study to compare print quality among several chain labs and my preferred pro lab. This is just to give you a general sense of the drastically different prints non-pro labs will produce, and to compare the quality difference between them and a pro lab. Even in this uncontrolled setting (I laid the images out in natural light, kept the settings the same from image to image and applied no processing after uploading beyond resizing for web in order to keep the playing field as level as possible), the quality difference is apparent.
Note that the Simply Color sample is printed on the luster paper as most of the other examples are shown (a few of the labs didn’t have any option available beyond the glossy paper). The Simply Color luster paper print is shown inside the album that I speak of below (I use it in my studio to show clients the different types of paper available for prints). It has a thin black border around the image.
And a second sample …
Some key points when preparing your images for print.
Calibrate!!
Always do your editing on a calibrated monitor. There is simply no other way to be certain that what you see on your screen is what you will see when your images are printed. This should be done well before you ever start processing your images. I recommend and use the Xrite EODIS3 i1Display Pro.A less expensive alternative is the Xrite CMUNDIS ColorMunki Display1. Keep in mind that there are other steps beyond the monitor calibration process that you’ll need to have done correctly in order to get accurate screen to print color in your images. These include using color profiles correctly (use the color profile recommended by your lab), soft-proofing (ask your lab if they have a soft-proofing profile available and use it) and having appropriate lighting when editing and viewing your images. I know each of these things are big subjects in themselves, but I’m trying to keep this on the simple side and will touch on these subjects in future posts with more in-depth detail.
Color Space, Soft Proofing, File Type and Size
Always refer to your lab before preparing images and uploading. They will have guidelines for color space (which will usually be sRGB or Adobe 1998 RGB – however check with your specific lab as many have their own profiles to use), file type (such as JPEG max quality, TIFF, etc), sizing, resolution, etc. Ask for a soft proofing profile which you can use to view exactly what your prints will look like when printed on their machines (as long as you are calibrated, that is). I like to leave my resolution unchanged in order to leave as much pixel data as possible – the only thing I do is crop if needed for the print’s aspect ratio (see here for details and how to’s), leaving the resolution blank (which leaves my image resolution as it is). But again, check with your lab to make sure you are preparing the files as they need them. Also, be sure to choose NO color/auto correction, especially if you are calibrated and have meticulously processed your image for perfect color – this will guarantee you get not only accurate but consistent results (when working with a reputable pro quality lab).


RELATED VIDEO


Share this Post
latest blog posts
-

-

-

-
 Christmas cards offers November 9, 2023
 -
 CVS Christmas card November 5, 2023
 -
 Christmas cards Making November 1, 2023
 -
 Make your own Love cards October 28, 2023
 -
 Cards from October 24, 2023
 -
 American Greetings Boxed Christmas cards October 20, 2023
 -
 Make your own Valentine cards online free October 16, 2023
 -
 Print your own Christmas cards October 12, 2023
 -
 Card companies online October 8, 2023