
 Illustrator has fantastic tools available for creating small print designs such as business cards. Follow this walkthrough on how to create a fun business card design complete with illustrated character. We’ll start by creating our sketchy figure from a profile shot with hand-drawn linework, then lay out the design with background pattern and textual information in a print ready template with margins and bleed areas.
The design we’ll be building is of traditional business card proportions, making use of both sides of the card. Just two colours are used in the design – Cyan and black – Cyan being the blue used throughout the design, and black being used at a very low percentage as the grey grid background. The use of single inks for each colour (C for Cyan and K for black from the CMYK model) will ensure a crisp end print.
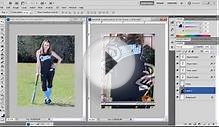
Let’s start with the sketchy linework of the illustrated character. Dig out a photograph with your best smile and import it into Illustrator. Lower the opacity and press CMD+2 to lock it into place.
Double click the Pencil tool to alter the settings. Change the Fidelity to 1px and the Smoothness to 12px, toggle off the Fill new pencil strokes and Keep selected options, but turn on Edit selected paths. This will help keep the accuracy of the path true to the movement of your mouse or pen. Clear out the default fill colour and set a black stroke at 1pt then trace an initial outline around the character.
Continue drawing paths, this time fleshing out the facial outline and hair line. If your line strays, the Edit selected paths option set earlier will allow you to redraw segments of the path to correct specific areas without having to start the path again.
 Move onto the inner features and trace the most prominent lines. Don’t worry about lines being rough or basic, this all adds to the hand drawn feel.
For areas of hair, draw lots of tiny strokes to fill out the relevant shapes. Fill the pupils with a black fill and add a small highlight to bring the eyes to life.
Add some detail to the neck and body areas, including creases and folds from clothing. Toggle off the photograph layer to preview the final linework character.
Fill out a head of hair with lots more small dense strokes, head hairs will require longer strokes, whereas facial hair can be made up of lots of tiny lines or specks.
Draw a selection across all the linework and group together. Move the illustration off to one side and review the linework for any misaligned intersections or gaps.
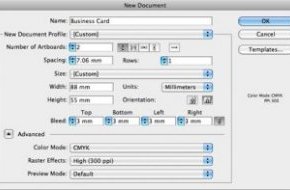
Create a new document in Illustrator. The business cards I’m used to designing come in at 88x55mm, but sizes can vary across different print firms, and of course will be created in the imperial metric system in the USA. Enter the dimensions according to your chosen printer in the width and height options, and the bleed amount below. With our cards being double sided, change the Number of Artboards option to 2. Finally, check your Color Mode is set to CMYK.
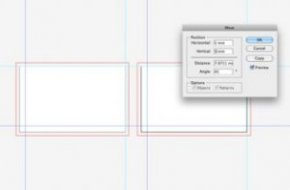
Drag out guides and align them with the black outline of the cards (Press CMD+R to toggle rulers on). Select the bottom horizontal guide and the two left hand vertical guides then hit Enter to open the Move window. Enter 5mm in the Horizontal and Vertical fields then click OK.
 Select the remaining guides and open up the Move window once again, this time enter -5mm in the fields. Now right click the document and select Lock Guides. These guides are in place to identify a 5mm safe margin around the edge of the business card.
Use the line tool to draw a short line with a 10% black stroke. Copy (CMD+C) and Paste in Front (CMD+F), then rotate it by 90degrees. Drag a selection across both objects and drag them into the Swatches palette. Delete the two original lines left on the artboard.
Draw a white rectangle across the first card, covering the whole template within the red bleed line. Copy and paste this rectangle, then fill the duplicate with the previously created pattern swatch. As the swatch repeats it will create a seamless grid pattern.
Paste the linework character into the business card document and change the stroke colours to 100% Cyan. Don’t forget to tweak the fill and stroke used to create the pupils of the eyes.
Move the character into place so it sits on the left side within the red bleed line. The illustration may extend beyond the margin guides, but keep the head within the black outline as this is the final card size once cropped.
Draw a cyan filled rectangle on the right side of the card. Run the right edge all the way to the bleed outline, and line the overall dimensions up with the background grid pattern. Use the Type Tool to enter your name in an impactful font. Here I’m using the fantastic League Gothic in white to reverse out of the cyan rectangle.
Continue adding textual elements to the design, but at a smaller type size and set in Cyan. I’m using some general profile links, but you might want to add the usual contact details often found on business cards.
Select all the elements used in the front side of the card and drag them over to the rear while holding the ALT key. Align everything up to the outer bleed line then delete the character, the background grid and contact details.
Change the white background rectangle to Cyan, then create another grid swatch but this time use 30% Cyan as the stroke colour. Drag this swatch into the Swatches palette and add it to a duplicate background rectangle.
Stretch the rectangle behind your name to fill the full width of the card and change the fill colour to white. Drag out one extra guide to identify the centre of the card, then use this guide to align up the text centrally. Switch the text colour over to Cyan then change the wording to a welcoming message.
The design of the card is pretty much complete. We have the subtle grid background providing a base to the design, the hand-drawn character and the all important contact details. On the rear the colour scheme is reversed, and the centre rectangle continued to house a nice, fun message.


RELATED VIDEO


Share this Post
latest blog posts
-

-

-

-
 Christmas cards offers November 9, 2023
 -
 CVS Christmas card November 5, 2023
 -
 Christmas cards Making November 1, 2023
 -
 Make your own Love cards October 28, 2023
 -
 Cards from October 24, 2023
 -
 American Greetings Boxed Christmas cards October 20, 2023
 -
 Make your own Valentine cards online free October 16, 2023
 -
 Print your own Christmas cards October 12, 2023
 -
 Card companies online October 8, 2023