 In this tutorial, I will show you how to make a pop up card for birthdays or weddings. This two tiered birthday or wedding cake pop up card can be used for many occasions. The birthday pop up card is a great card to give to that special someone on their birthday. Or, you can make a wedding pop up card for that wedding couple that you couldn’t find the right gift for. This round cake popup card can also be used for wedding invitations, wedding favors or thank you cards.
This popup cake card design uses ribbon for the sides of the cake so that when the card is opened, it opens completely round. If the sides are made of paper, the creases can sometimes prevent the cake from opening up completely, making the cake look oval. Plus, there are so many pretty ribbons out there to choose from, letting you customize your cake design.
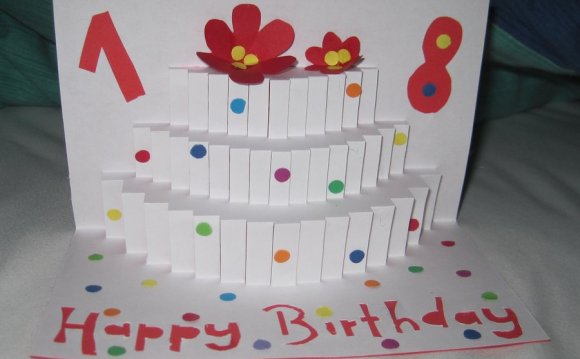
This is what the card looks like. I’ve made 4 different popup birthday card versions shown below:
I’ve used the same template to create 4 different popup wedding card versions that can be seen in this image:
If you want to watch the card in action, check out the video of the birthday and wedding cards below:
Video Tutorial
I’ve created a video with detailed step by step instructions on how to make this pop-up card. The video was rather long so I broke it down to 2 parts. Here is the Part 1:
 Here is Part 2 of the tutorial:
Step by Step Instructions
For those of you who prefer reading instructions instead of watching the video, I’ve written instructions on how to make this pop up card:
2. Find a ribbon you want to use for the sides of the cake. You can buy ribbon from Michaels or Amazon. Use cloth (satin or silk) ribbon instead of the cheap ribbon used for wrapping presents. You can test the ribbon by folding it to see if the crease stays. A small crease is ok, but a deep crease is not good. The ribbon can be either 5/8” or 7/8” thick.
3. Use the templates to cut out the pieces from card stock. You can view my tips on using templates post for more help. If you are using a 7/8” ribbon, you will need to cut out parts from page 1. If you are using 5/8” ribbon, you will need to cut out parts from page 2. Page 3 is the inside card and page 4 is the outside card. Page 5 has the extra decorations which include cake toppers, candles, some text and paper ribbon if you do not have cloth ribbon.
4. The cake pieces are labeled A-F. Assembled the pieces in alphabetical order. You may want to gently write the letters on the pieces to keep track. First assemble piece B into the center slot in piece A as shown in the image below:

5. Then carefully slide piece C over the legs of piece A and B.
6. Then carefully slide piece D over the legs of piece A and B.
7. Then fold piece E along the dotted line and slide it over the legs of piece B as shown below. This piece keeps the cake stable and helps the ribbon stay vertical when the card is opened.
8. Attach piece F over the legs of pieces A, B and D. Carefully pull the tabs through piece F. One tip I use is to carefully “pinch” the tab while pushing piece F over the tabs, between your fingers, with a rolling motion. You can see how I “pinch” the tabs of the legs in the image below.
9. Insert all of the tabs from the cake legs into the inside card (found on page 3 of the template). Be careful to make sure that the tabs of piece E line up with the holes in the inside card. Make sure that all of your holes are cut through cleanly. Use the same “pinching” motion to pull the tabs through the inside card. You can see how the tabs line up with the holes in the image below.

10. The image below shows the top and bottom view of the cake assembled to the inside card.
11. Tape the tabs down to the inside card as shown in the image below.
12. Choose the cake topper you would like to put on the cake. If you are making a birthday cake, you can use either single candles or numbers. You can also cut out flames to put on top of the candles. If you are creating a wedding cake, then you can use the heart or bride and groom toppers. Insert the cake topper into the hole on top of the cake. Glue the cake topper to the cake if you want to make it permanent.
13. Cut 2 strips of ribbon with lengths of 6.25” and 10.5” (16cm, 27cm). If you do not have ribbon, you can cut out the 2 strips using the template. I would suggest using paper instead of cards stock for the sides of the card if you do not have ribbon.
14. Use double sided tape to attach one end of the ribbon the back of the cake as shown below. You can also use glue, but it can get messy if the glue is not fully dried.
15. Use double sided tape to tape the loose ends of the ribbon to the backside of the card as shown in the image below. Make sure that the ribbon is not too tight. There should be about 1mm between the ribbon and the cake. This will make sure that when the cake is opened, the ribbon does not hang on the edges of the cake.
16. Close the card about half way so that the ribbon can be pushed aside from the cake. Attach another piece of double sided tape between the ribbon and the front of the cake as shown in the image below. This may be easier if you use tweezers or if you put the tape on the end of a pen because the tape can be hard to remove from your finger. Close the card and press firmly where the tape is to ensure good attachment of the ribbon to the cake.
17. Cut out the card backing from page 4 of the template. Slide the inside card into the corners of the card backing as shown below.
18. Open and close the card to make sure everything functions properly and the ribbon does not get caught on the cake sides. If it does, then loosen the ribbon and increase the gap between the ribbon and the cake. Here is what the final card looks like (I used a heart cake topper to show a different variation from the candles).


RELATED VIDEO

Share this Post
latest blog posts
-

-

-

-
 Christmas cards offers November 9, 2023
 -
 CVS Christmas card November 5, 2023
 -
 Christmas cards Making November 1, 2023
 -
 Make your own Love cards October 28, 2023
 -
 Cards from October 24, 2023
 -
 American Greetings Boxed Christmas cards October 20, 2023
 -
 Make your own Valentine cards online free October 16, 2023
 -
 Print your own Christmas cards October 12, 2023
 -
 Card companies online October 8, 2023