
 They say a butterfly dies every five minutes*. But you only need about four minutes to learn how to make a collage with PicMonkey’s easy-peasy tutorial, and then you can create the most awe-inspiring photo collage! Will they save a butterfly? Probably not, but they’ll all be happier knowing you know how to make a photo collage. (*Don’t go fact-checking us on that!)
This project gets you a slick collage to use as your Facebook cover image.
1. Import your photos into our Collage Maker
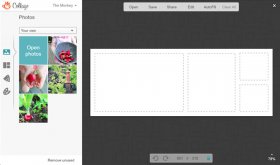
Hover over the “Collage” button at the very top of the home page. A dark grey navigation menu appears below it. Click one of the photo storage options (your computer’s hard drive, or your Dropbox, Facebook, or Flickr account) to get your photos. Alternatively, you can explore Collage with our sample photos, to the right, by clicking one of them.
You can also import photos by clicking “Open photos” once you’ve launched the Collage application.
Tip: You can select several photos at once (using Command-click on Mac or Control-click on Windows) and the whole group will drop into Collage’s image tray instantly.
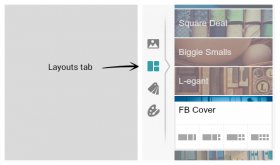
 2. Choose a layout for your photo collage
Click the Layouts tab on the far left. Layouts are completely flexible, so you can make changes to any design you choose.
3. Check overall dimensions
The bottom toolbar shows the overall dimensions of the collage. If you’ve chosen the Facebook Cover layout, you shouldn’t change the dimensions because they’re exactly right, but you can easily do so by hovering and dragging your mouse over an outer border of your collage. When you see two thin blue lines appear, move the double arrow to stretch or shrink it. You can also do so by typing new numbers in the dimensions toolbar. If you need to unlock the proportions, click the padlock icon so it appears grey, not blue.
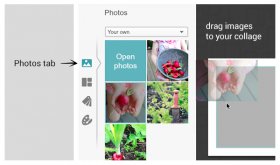
4. Drag photos into your collage layout
Click the Photos tab on the far left. Drag images from the image tray and drop them into your photo collage. Or you can click the “Autofill” button in the top toolbar, and see if you like the arrangement. Check marks appear on images in the tray that have been placed into the collage.
You can remove photos from the collage at any point but you can only remove them from the image tray if they’re not being used in the collage. Remove by hovering on the photo until you see an “x” in the corner, and click it.
5. Tweak your photo
 Hover your cursor over an image in a collage cell, and notice the “Edit” button in the corner. Click it, and an editing palette appears, with a white outline around the image you’ve selected. The Basic tab of that palette lets you resize, rotate, flip, and adjust the exposure of the image. Move the “Size” slider to zoom in, and then click on the image and drag it around in the cell until you like its new cropping.
6. Modify your collage layout
To tweak the sizes of the images, hover your mouse over the inner border of a cell, and you’ll see two blue lines and the mouse pointer will become a double-headed arrow. Drag the arrow to adjust the size of the images, and watch them shrink or grow and re-arrange themselves beautifully.
To add new cells to the collage, drag a photo onto an inner border or outer edge of a cell. When the thin blue bar appears, drop your photo into it. To delete a cell, hover your mouse over it until the “X” appears and click it. Hover over an image you’ve placed in a cell and the move cursor (four arrows) will appear. Use it to drag your image a bit to adjust its position in the cell.
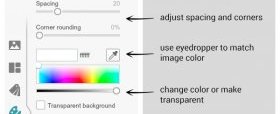
7. Create a background
Click the Background tab on the far left. Adjust the “Spacing, ” “Corner rounding, ” and “Color” sliders until your background is just right. Use the Eyedropper to match the background color to a particular color in the photo.
 Tip: If you’re creating a photo collage project that requires a transparent background, check the “Transparent background” box at the bottom and be sure to save the file as a .PNG. Facebook doesn’t support transparent backgrounds.
8. Add a swatch for layering text onto
Click the Swatches tab (the tags icon). Bam! You now have a bunch of colorful swatches, solid and patterned, in your image tray. To see more swatch options, click the dropdown button and select a different theme.
After you’ve dragged a swatch into an empty cell, click the Edit button in the top toolbar. This will bring your design into the Editor for overlays and text.
Note: Be absolutely sure you love your collage design before you click Edit, because there’s no going back to Collage to fix a few things after you’ve brought it into the Editor.
9: Add text and more in the Editor
In the Editor, use the text tool to write your message and apply it to the empty cell. You can also add overlays, and anything else in the Editor tabs. Just remember — especially with effects, textures, and frames — that they get applied to the entire collage at this point (unless you use the paintbrush/eraser to apply it to a smaller area).
Now save it, and admire your heartbreaking work of staggering genius. You’ve done it! You’ve created your first picture collage.
10. Post collage on Facebook
If you’re making a picture collage for your Facebook cover image, post it by hovering your mouse over the photo area on your Facebook Timeline. When “Change Cover” appears, click it. Click “Upload Photo, ” select the photo from your hard drive, and then “Save changes.” Wah-lah! Your Facebook cover is a super-boss collage and your friends all want to know how you made it. Tell them the Monkey did you a solid.


RELATED VIDEO


Share this Post
latest blog posts
-

-

-

-
 Christmas cards offers November 9, 2023
 -
 CVS Christmas card November 5, 2023
 -
 Christmas cards Making November 1, 2023
 -
 Make your own Love cards October 28, 2023
 -
 Cards from October 24, 2023
 -
 American Greetings Boxed Christmas cards October 20, 2023
 -
 Make your own Valentine cards online free October 16, 2023
 -
 Print your own Christmas cards October 12, 2023
 -
 Card companies online October 8, 2023