 Mac OS X’s Address Book app is capable of printing elegant envelopes, but if you use the default settings, you’ll churn out envelopes that are workmanlike, but dull. With very little effort, you can create a custom envelope template, adjust the sizes of the address blocks, and spice up your envelope with a new font, a splash of color, or even a company logo.
Creating a template
One of the biggest challenges of printing envelopes is choosing a compatible envelope size from Address Book's list of templates. This is especially problematic for greeting cards and invitations, which typically have non-standard sized envelopes. My advice? Forget about finding a matching template. You’ll save time—and avoid misprinted envelopes—by creating a custom envelope template.
Open Address Book and find an address you’d like to print on an envelope (no need to select multiple addresses). Now, choose File->Print. At the left of the print dialog, you’ll see a print preview; on the right, a list of printing options. (Click the disclosure triangle on the right side of the dialog box if you do not immediately see these preview and printing options.) Choose Envelopes from the Style pop-up menu, and you will see three tabs: Layout, Label, and Orientation. Click Layout and then, from the Layout pop-up menu, choose Define Custom. You’ll be asked to name the template, so enter an appropriate name (i.e., Wedding Invitations) and click OK.
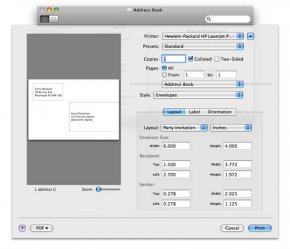
Now grab a ruler, measure your envelope, and enter the width and height into the appropriate fields. If you’re using inches, remember that you’ll need to convert the fraction to a decimal (9 1/8 = 9.125). You’ll also want to avoid pressing return after you enter a number, or you’ll accidentally send the envelopes to print. Instead, press tab to advance to the next field. This automatically saves changes to the template.
It’s easy to create a custom envelope template—just measure your envelope and enter the dimensions.
Resizing address blocks
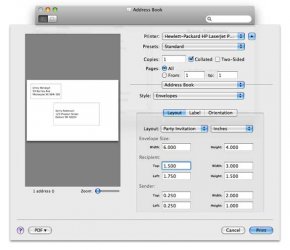 After you’ve entered the dimensions of your envelope, take a look at the print preview on the left. It’s bound to be a bit of a mess, with both address blocks out of place. In the dialog, immediately below Envelope Size, you’ll see sections for both Recipient and Sender. The Top and Left fields specify the placement of the address block on the envelope, while the overall size of the address block is determined by Width and Height fields.
As a general guideline, the width of the sender’s address is approximately one-third the width of the envelope, while the width of the recipient's address is about half the width of the envelope (a 6-by-4-inch envelope might therefore have a two-inch sender address and three-inch recipient address). Placement of the sender’s address is top left and usually requires no change; you will, however, want to move the recipient address block so that it’s better centered on the envelope. You may have to play around with the placement a bit until you settle on where everything looks best.
Notice that the size of the address text varies with the width and height you set for each address block. The maximum size of the text depends on the currently selected font, which by default is 14-point Lucida Grande. You’ll change this in the next section; for now, use the gray outlines of the address blocks as guidelines, not the text itself.
Adjust the address blocks so that the sender’s address is smaller than the recipient's.
Customizing your envelope
Now that you’ve locked in the layout, you can add some character to your envelope. Click Label, and you’ll see three important options: Color, Image, and Font.
Color, as you might expect, lets you set a color other than black for your address text. Adding a splash of color to your envelope can be fun, but be careful that the color you choose isn’t too light. You’ll also want to use caution when printing colored text on colored envelopes, because the printed text will be tinted by the color of the envelope.
Image allows you insert artwork to the left of the sender’s address, which is a perfect spot for a small picture or company logo. Click Set and choose an image file; most image formats (including JPEG, PNG, and PDF) are supported. The image will be approximately the same height as your address.
Font, of course, lets you replace Lucida Grande with the font of your choice. Click Set to open the font window and choose a new font. It’s best to avoid overly ornate fonts because they cannot be read by automated mail sorters. You’ll also need to choose a font size—keep an eye on the print preview and choose a font size that fills out the recipient address block. Close the font window when you’ve made your choice.
Changing the font, inserting a company logo, and adding a splash of color can go a long way toward making your snail mail inviting.
Printing your envelope
Now, it's time for a test print. Click the Orientation tab, and per your printer’s requirements, rotate the envelope. (Most printers require a portrait orientation for envelopes.) Don’t waste an envelope just yet; instead, print to regular paper. If this first print goes well, then try printing on an envelope. And when you’re emboldened by that success, you can go ahead and start using your template to print cool, custom envelopes.
RELATED VIDEO


Share this Post
latest blog posts
-

-

-

-
 Christmas cards offers November 9, 2023
 -
 CVS Christmas card November 5, 2023
 -
 Christmas cards Making November 1, 2023
 -
 Make your own Love cards October 28, 2023
 -
 Cards from October 24, 2023
 -
 American Greetings Boxed Christmas cards October 20, 2023
 -
 Make your own Valentine cards online free October 16, 2023
 -
 Print your own Christmas cards October 12, 2023
 -
 Card companies online October 8, 2023