
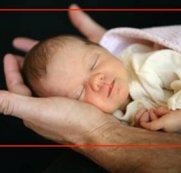
Dark or shadowed areas
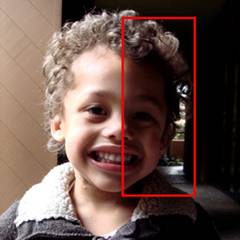
If we make adjustments to darken the photo, the dark shadowed areas will be darker and will be compromised.Overexposure on the focus area
The main areas are overexposed due to the flash being too close and reflecting right off of the face. If we darken, everything in the background will be too dark.Dark Photos
Dark photos typically occur when there is not enough lighting or a flash was not used. When using a flash, be sure to keep some distance between you and the subject(s). A good rule of thumb is about three feet awayfrom the subject(s).
Tip: Sufficient lighting or use of flash is very important when shooting indoors or in locations that are not properly lit. Be sure to stand about 3-4 feet away from the subject(s).Grainy Photos
Grainy photos usually occur when there is not enough lighting. If the photo is grainy to begin with, there is really no way to edit out the graininess whether in color or black and white.
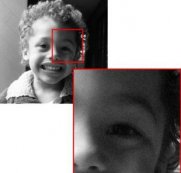
Tip: Sometimes a photo may seem to look clear overall on the monitor. One way to watch out for graininess is to zoom in on focus areas, like the eyes or nose.Pixelated Photos
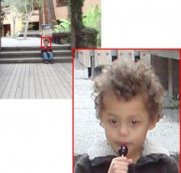
Pixelated photos occur when the resolution is too low. Photos that have a low resolution simply have fewer pixels (picture elements) per inch. While the naked eye may not notice a difference on the screen, once printed it is very noticeable. Remember, the higher the resolution, the less fuzzy the photo will look. When a photo is zoomed out, it may seem like a photo that meets the recommended resolution size, but the majority of time, the photo will need to be cropped in to just the subject. When we crop the photo, the resolution size becomes smaller and this usually causes pixelation.
The original photo below is 1536 x 2048 in pixel size, but when we crop or zoom in closer to just the subject’s face, the resolution size becomes 140 x 165 pixels. In addition, you can visually tell there is pixelation.
How do I make my photo fit on the card?
Some cards are designed for a certain size or orientation of your photograph. Here is an example of clear photos with the correct orientation that fits perfectly on the card with tight photo boxes.
Tip: The orientation of a photo will affect the way a photo is cropped into a photo box. Please keep in mind the space around the subject and make sure there is enough room to crop. Please keep in mind when we print the card, photos that print to the edge of the card may be cropped up to 1/8th of an inch. Why does my photo cut off when it's place on a card?
Your photo may meet the recommended resolution size, but it will not fit properly in the pre-set photo box of the card you choose.
In the example below on the left, the family photo submitted does not fit into a tight vertical box. When placed into the baptism photo card below, the subjects on the sides get cropped off and covered by the scalloping. In the example on the right, the sibling photo does not fit into such a tight horizontal box. When placed into the baptism photo card below, the forehead of the older boy is cropped off and the chin is covered by the scallop design.
In the above example, please keep in mind when the card prints, we may crop up to 1/8th of an inch on any of the four sides of the card.
Tip: To fit a photo into such a tight photo box, it is always good to have the photo a bit more zoomed out, and have the subject(s) in the correct orientation to fit in the photo box.In the below example, you can see that it is very difficult to squeeze many people into a square photo box.
Tip: When you have a number of individuals lined across in one photo, it will not fit in a square photo box unless the photo is more zoomed out. If four people were lined up alternating in two rows in the photo, then we would be able to fit them better into a square photo box. Tip: Please keep in mind, a vertical photo best fits into a vertical photo box. A horizontal photo best fits into a horizontal photo box.Will you edit my photo?
One of our designers will edit your photograph(s) to ensure best printing results. However, we do not offer extensive photo editing such as extending a background with detailing or taking out dirt or stains on a shirt. We do not offer extensive editing service because we cannot guarantee the detail editing will look natural or will meet your expectations. However, we do make many changes to make your photograph print with great results. You can submit your photo and be assured that our professional designers will make all the necessary enhancements. We will crop, eliminate red eye, brighten, sharpen, adjust color levels for best printing, or convert to black and white or sepia at no additional charge.
-
Example of editing we will do (remove red eye)
-
Example of editing we CAN NOT do:
We cannot remove the red net behind the subject because of the detailing around his hair. We cannot remove the dirt from the shirt.

RELATED VIDEO


Share this Post
latest blog posts
-

-

-

-
 Christmas cards offers November 9, 2023
 -
 CVS Christmas card November 5, 2023
 -
 Christmas cards Making November 1, 2023
 -
 Make your own Love cards October 28, 2023
 -
 Cards from October 24, 2023
 -
 American Greetings Boxed Christmas cards October 20, 2023
 -
 Make your own Valentine cards online free October 16, 2023
 -
 Print your own Christmas cards October 12, 2023
 -
 Card companies online October 8, 2023