 What You'll Be Creating
In this tutorial, you will learn how to create an elegant vintage greeting card with a fawn illustration. You will use a sketch drawn directly in Adobe Illustrator and then outline it with the Pen Tool. You will also learn to draw holly berries using basic shapes, and add a simple striped background. Let's imagine a snowy forest, wild animals and one tiny fawn, jumping directly into your artwork...
Step 1
Open your Adobe Illustrator and create a new document (Control-N). Today, we will start from the background. So, take the Rectangle Tool (M) and create a rectangle with 600 pixels width and 800 height. Set the fill color at R=141 G=183 B=204.
 Step 2
Then create one more copy in the front, and make it darker (R=117 G=170 B=191) and narrower. Be careful to not make it shorter, just narrower.
Step 3
Keeping the blue stripe selected, hold the Shift and Alt keys, and move this stripe to the right. Then keep pressing Control-D to repeat your last movement. Stop when you fill up the light blue rectangle.
Now we need to align everything. Select just the dark blue stripes, right-click the mouse and select Group. Holding the Shift key, select the light blue background together with the stripes. Go to the Align panel (Window > Align) and press the Horizontal Align Center button.
 Let's name the layer where you drew the background. For this, go to the Layers panel (Window > Layers), Double-click on the existing layer, and in the newly appeared window, type striped background, and click OK.
Create another layer and call it oval background. Lock the "striped background" layer (simply click on the empty gray square where the lock icon will appear).
On the new layer we will draw another background. Hit the Ellipse Tool (L) and draw an oval with fill color R=214 G=234 B=230.
Step 2
Keeping the light blue oval selected, go to Object > Path > Offset Path. In the new dialogue window, enter Offset 15 px, Joins Miter, Miter Limit 4, and press OK. Delete the fill color from the new oval and set it as a stroke color. Make the stroke thicker simply by increasing the Stroke Weight on the Stroke panel.
 Step 3
Keep the oval with no fill selected and go to the Stroke panel. Check the Dashed Line box there. Put 12 pt in the Dash box, and make the stroke thicker.
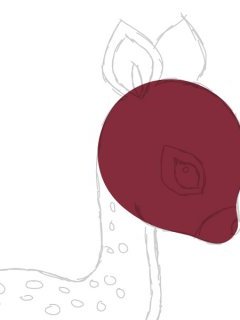
Image 1. Be sure to delete the stroke color and set the fill color to R=158 G=42 B=77. Using theEllipse Tool (L), draw a circle while holding the Shift key.
Image 2. Let's create a sepal (the base of the berry) from an oval (R=18 G=29 B=56). You will need to get sharp corners with the help of the Convert Anchor Point Tool (Shift-C). Click on the top and bottom anchor points. Keep the ellipse selected and choose the Rotate Tool (R). Click the Enter key on your keyboard to bring up the dialogue box. Enter 90o and press Copy.


RELATED VIDEO


Share this Post
latest blog posts
-

-

-

-
 Christmas cards offers November 9, 2023
 -
 CVS Christmas card November 5, 2023
 -
 Christmas cards Making November 1, 2023
 -
 Make your own Love cards October 28, 2023
 -
 Cards from October 24, 2023
 -
 American Greetings Boxed Christmas cards October 20, 2023
 -
 Make your own Valentine cards online free October 16, 2023
 -
 Print your own Christmas cards October 12, 2023
 -
 Card companies online October 8, 2023